How to downgrade Windows 11 to Windows 10
 Image: Phil Desforges / Pexels
Plenty of people like Windows 11, but if you’re not one of them, don’t worry. You can go back to Windows 10.
That’s right—even if you bought a computer with Windows 11 pre-installed, you can ditch Microsoft’s latest operating system. The process just varies depending on how you got Windows 11.
Scenario 1: Roll back an upgrade within the first 10 days
For this method to work, you can’t have wiped your system when you upgraded from Windows 10 to Windows 11. Instead, Windows Update or the Windows 11 Installation Assistant left your files and apps intact when performing the switch. Also, you must still be within Microsoft’s absurdly short 10-day window for rolling back the upgrade.
If you’re not sure about either point, not to worry. You can still follow these steps to see if the option is still available. Before you begin, we advise you first back up your files as a precaution. You can use our guide on how to back up your system for free to make that process easier.

PCWorld
PCWorld
PCWorld
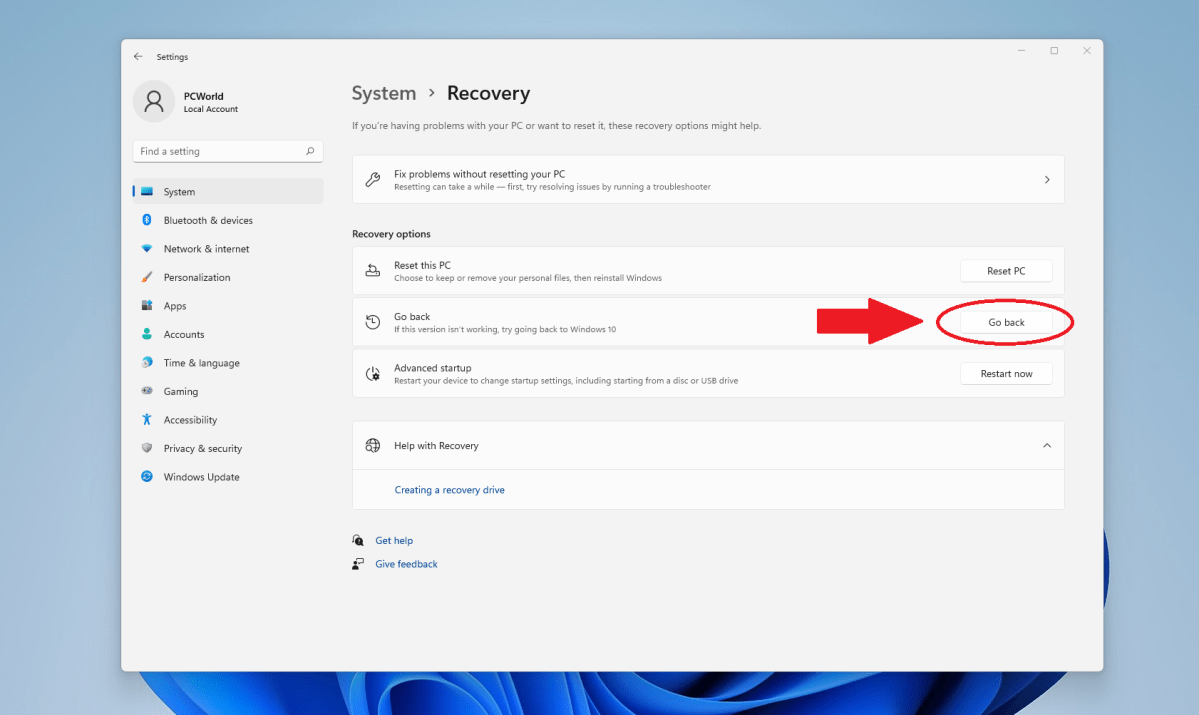
1. Open Settings, then Recovery options. The fastest way to do this is to open the Start Menu and type “recovery options.”
2. Look for Go back. If you don’t see this available, you’re outside your 10-day window and will have to use the other method below to downgrade.
3. Click on the Go back button to begin the process.
A window will appear asking why you’re going back to Windows 10, then it’ll be followed by several other interstitial screens that offer suggestions and/or advice before you begin the roll back. Pay attention to the one that warns about the potential need to reinstall apps and programs. You may want to make note of what you have installed before proceeding.
Scenario 2: Downgrade after 10 days (or from a clean Windows 11 install)
Already past the 10-day rollback period for an in-place upgrade of Windows 10, or your computer came with Windows 11 already installed? A clean wipe and install of Windows 10 is your only option.
This method isn’t hard to do but takes a little more time, since you’ll need to back up your files and create installation media before you can begin. You should also make note of your Windows license key, just in case you’ll need it later for Windows 10 activation.
If you’re not sure how to best back up your PC, check out our suggestions for getting started, as well as our round-ups of the best free backup software and best backup services. You can also use Magical Jelly Bean KeyFinder to figure out your Windows license key.

PCWorld
PCWorld
PCWorld
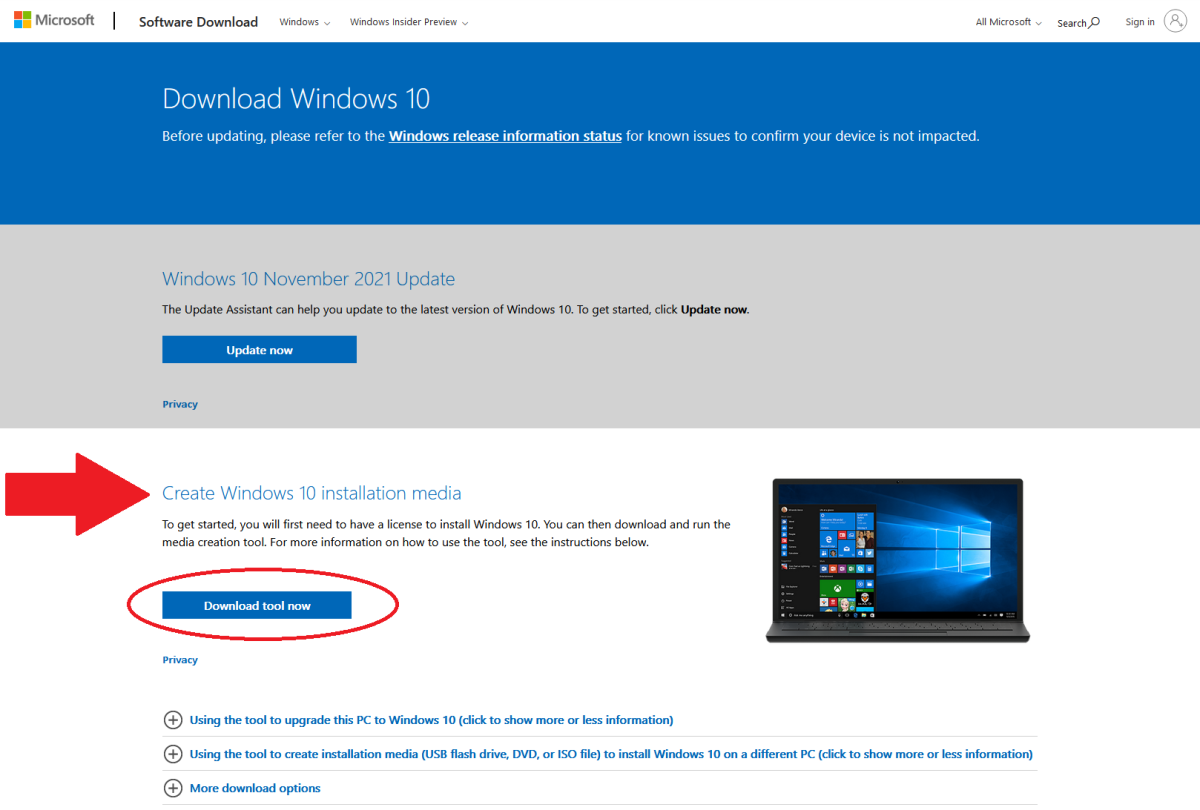
To create a bootable USB drive or DVD with Windows 10, you’ll need a USB drive with at least 8GB of space or a blank DVD. Head to Microsoft’s Download Windows 10 page, then download the Windows 10 installation media tool and install it. The tool will guide you through the steps.
Once the USB drive or DVD is ready, and you’ve got your backups and license key info squared away, restart Windows. If the installer doesn’t automatically start, you’ll need to reboot again and enter the boot menu by hitting a key on your keyboard (e.g. F12) as soon as you see the initial boot screen. Some PCs will list this information on the boot screen, but if yours doesn’t, you can search online for the correct key to press.
In the boot menu, select your USB drive. It should then load the Windows 10 installer. Follow the steps, including entering your product key. (Better to find out now that the key isn’t working properly, before you wipe your system.) After the installer’s work is done, you should have a fresh copy of Windows 10, fully activated and ready to go.
Author: Alaina Yee, Senior Editor

Alaina Yee is PCWorld’s resident bargain hunter—when she’s not covering software, PC building, and more, she’s scouring for the best tech deals. Previously her work has appeared in PC Gamer, IGN, Maximum PC, and Official Xbox Magazine. You can find her on Twitter at @morphingball.
Recent stories by Alaina Yee:
Windows includes built-in ransomware protections. Here’s how to turn it onWindows blocks apps from changing your default browserWindows Hello can protect your Chrome passwords. Here’s how


